

Automating Recruitment Follow-ups with Python, AWS Lambda and Amazon SES
A small project to understand the Cloud, its features, its event-driven behaviour and its security aspects


It can be tedious work to keep updating the candidate set for company recruitments for mass follow-up emails. What if I tell you that this process can be automated with the help of The Cloud? Let's see how it's done!
Understanding the Problem
A lot of companies and their recruitment teams have proprietary/third-party Resume Parsing Solutions that can extract applicant information from their resumes'. However, communicating with these applicants for follow-ups or sharing information in general, is a separate task.
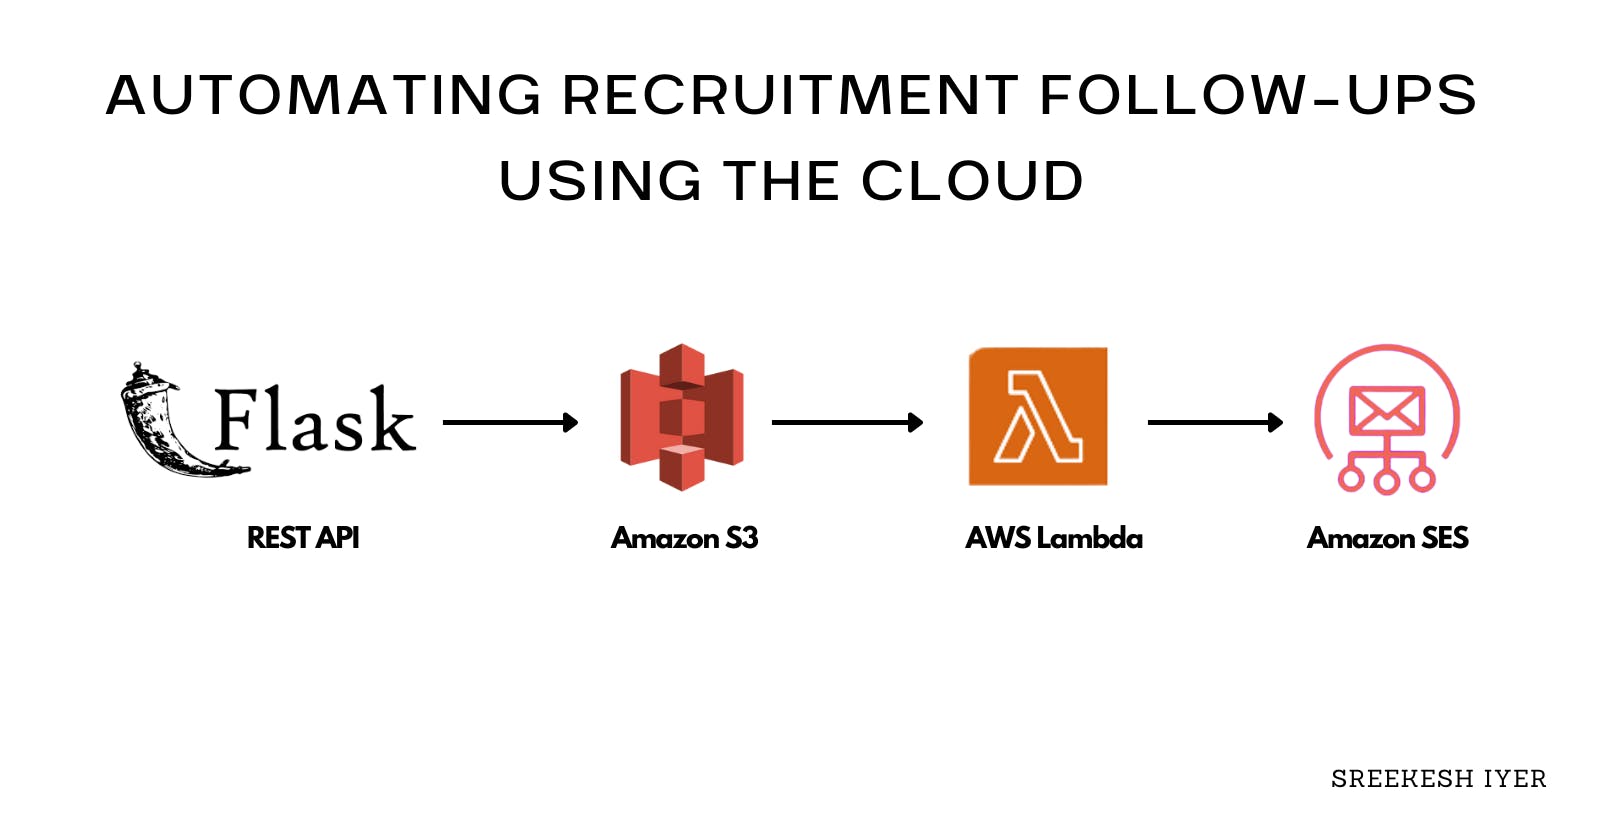
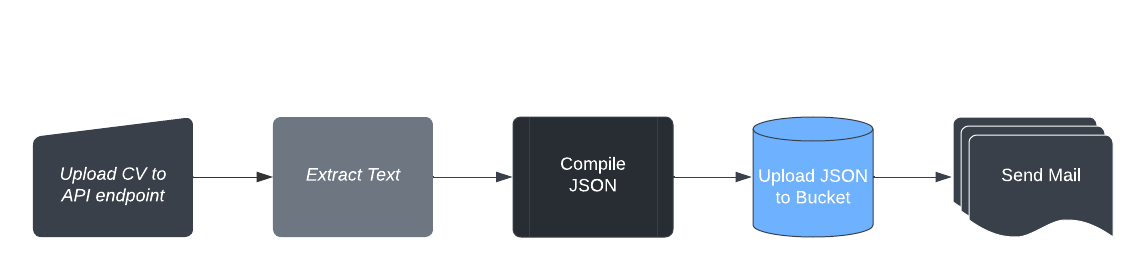
What we are trying to achieve, is to set up a pipeline where, on every CV/ Resume upload to an API endpoint, the name and email extracted in JSON are uploaded to a storage bucket and a follow-up email is sent to the candidate requesting them for an interview or proceeding with the next step in the process.
The Proposed Solution
Let's assume I am a recruiter and have a total of 200 Resumes on my system, and I pick 12 candidates that I'd like to interview going forward. I'd look for a solution to be able to send them follow-up emails in one click.
Here's where the Cloud's role comes in. As soon as I choose the 12 candidates, their candidate meta-data, that is in JSON which includes their name and email, is uploaded to a Storage bucket, that is linked to a Lambda function. This lambda function, on JSON-file upload, sends a follow-up email to all the selected candidates.
Handling Multiple File Uploads✅
Cost-Effective✅
Easy to Scale✅
Faster than Serverside mailouts✅
Cloud Services to be used
- AWS IAM
- AWS S3
- AWS Lambda
- Amazon SES
App WorkFlow
 In this case, we'll be using Python Flask to create an API, just to demonstrate the Resume Parser since we don't have a real one.
We'll be using the Textract and Spacy packages to extract names and emails from the Resume. We then upload this result in JSON to an AWS S3 Bucket. This S3 Bucket is connected to a Lambda function looking for PUT Events, on which it sends out emails with the help of Amazon SES.
Creating a New IAM User

We'll need a new IAM User that can programmatically upload a file from our Flask API endpoint.
Create a new User in the IAM Console and check the Access Key option so that it provides an Access Key ID and Secret key that we'll use later.
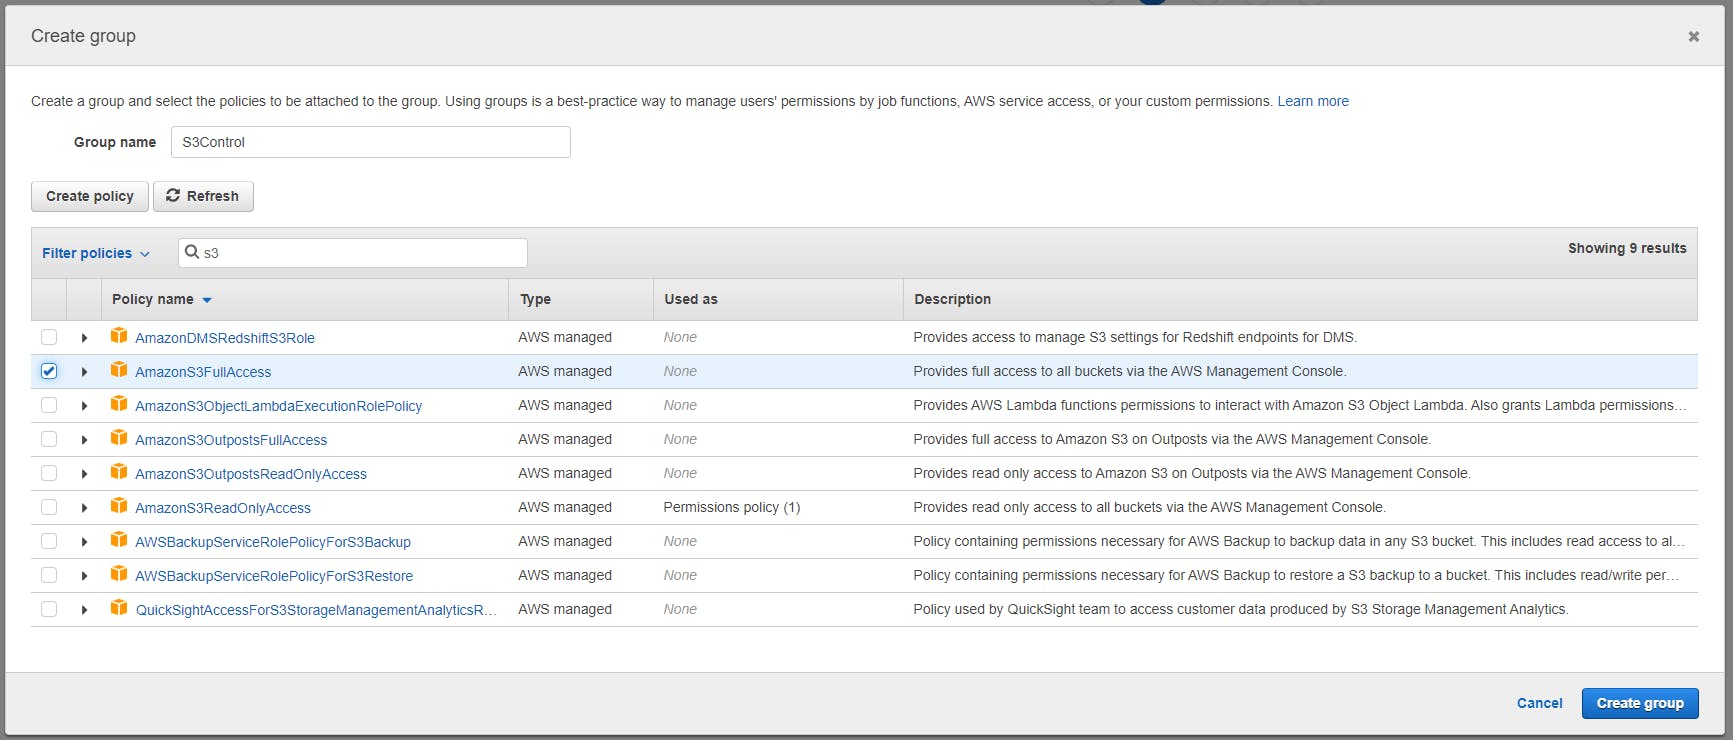 Create a new User Group that allows full AWS S3 Access, and attach that to this new user.
Keep the generated credentials with you for now, we'll use them later.
Creating the main AWS Lambda function
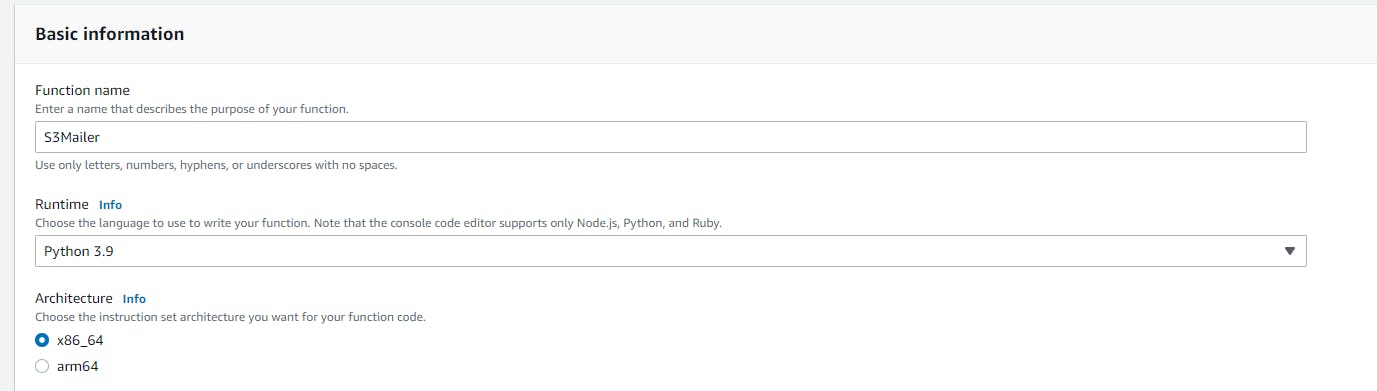
Create a New function in the AWS Lambda Dashboard.
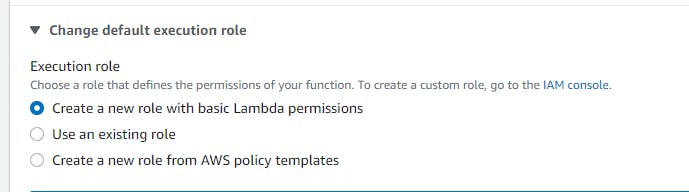
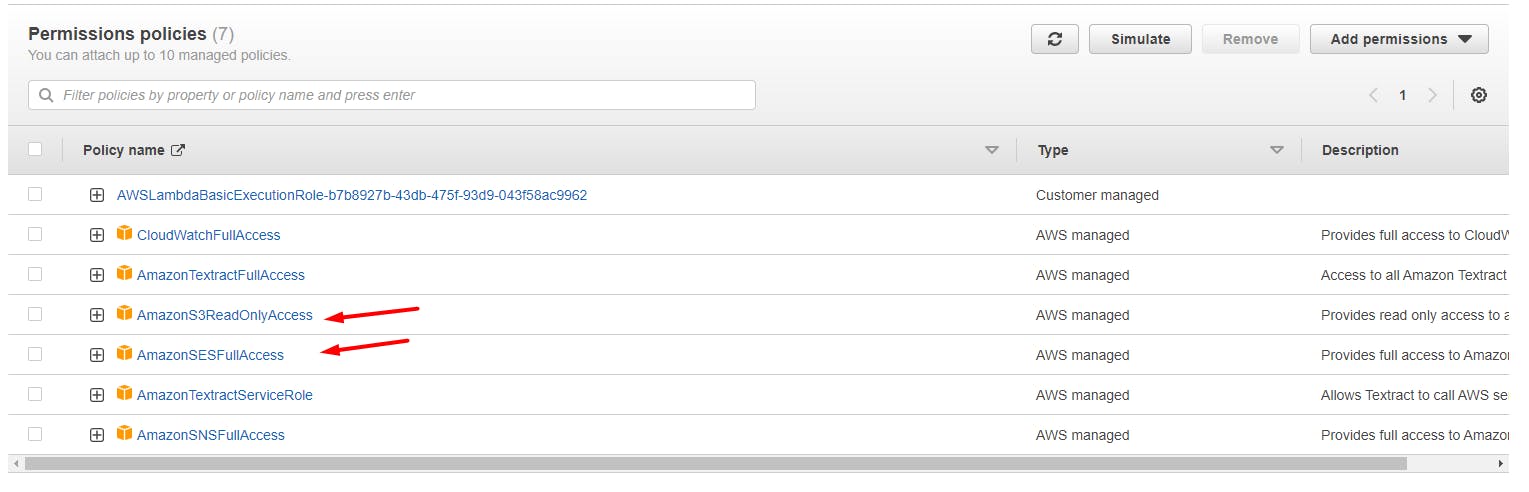
Choose Python 3.9 as the Runtime and create a role that allows access to Amazon S3 and SES. You can choose a pre-existing role or create a new one.
Here's the code you'll need in this function
import json
import boto3
import urllib
def lambda_handler(event, context):
# The function is called every time a file is added to the S3 Bucket
# Fetch Bucket Name, File name from the event
bucket_name = event["Records"][0]["s3"]["bucket"]["name"]
key=event["Records"][0]['s3']['object']['key']
key = urllib.parse.unquote_plus(key,encoding="utf-8")
# Create an S3 Client
s3_client = boto3.client("s3")
# Fetch this particular file and its contents
s3_response = s3_client.get_object(Bucket=bucket_name, Key=key)
file_contents = s3_response["Body"].read().decode()
file_contents = json.loads(file_contents)
# Get the Details viz. email and name
name = file_contents['name']
email = file_contents['email']
# Create an SES Client
ses_client = boto3.client("ses")
# Create an Email Template (also can be done in SES Dashboard)
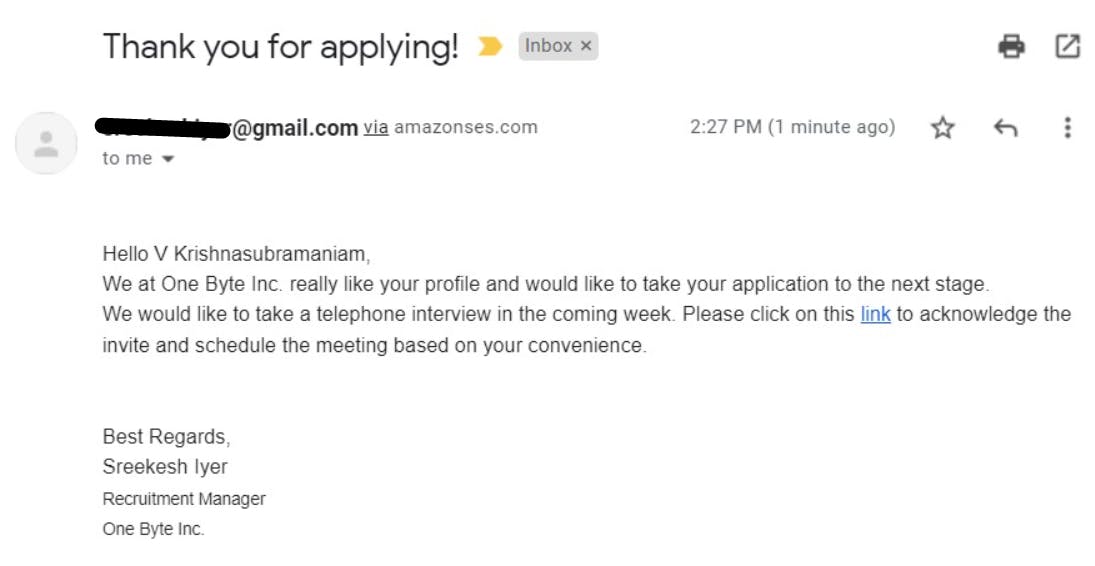
subject = "Thank you for applying!"
body = f"""
<br />
<p>
Hello {name}, <br />
We at One Byte Inc. really like your profile and would like to
take your application to the next stage.
<br />
We would like to take a telephone interview in the coming week.
Please click on this <a href="shorturl.at/ehjy9">link</a> to acknowledge
the invite and schedule the meeting based on your convenience.
<br/>
<br />
<br />
Best Regards, <br />
Sreekesh Iyer <br />
<small>Recruitment Manager<br />
One Byte Inc.</small>
</p>
"""
message = {
"Subject": {
"Data": subject
},
"Body": {
"Html": {
"Data": body
}
}
}
# Send the email
ses_response = ses_client.send_email(Source="sourceemail@gmail.com", Destination={
"ToAddresses": [
email
]
},
Message=message
)
What this function does is, it fetches the content from the S3 Bucket and sends the email using SES to the email that was mentioned in the JSON content.
Creating an S3 Bucket
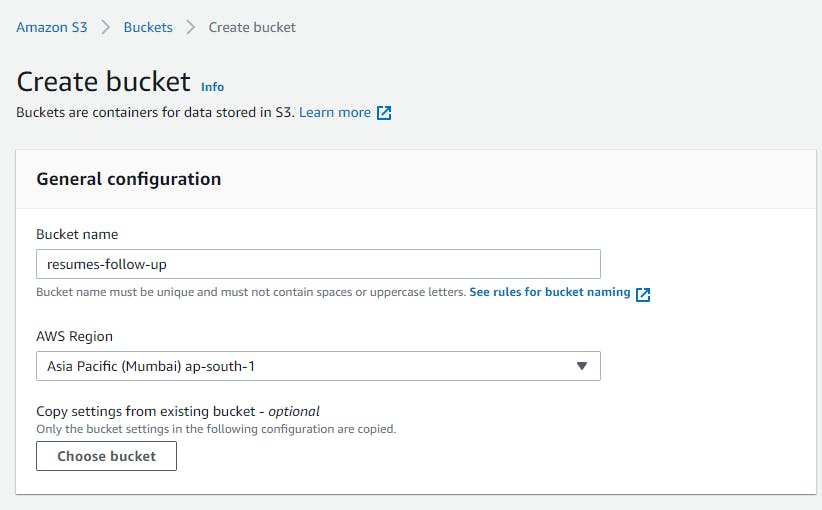
Create a new Amazon S3 bucket in the console. Just one change in the options, enable Bucket Versioning.
Adding an Event Notification
 Under properties for this very S3 Bucket, look for 'Event Notifications'.
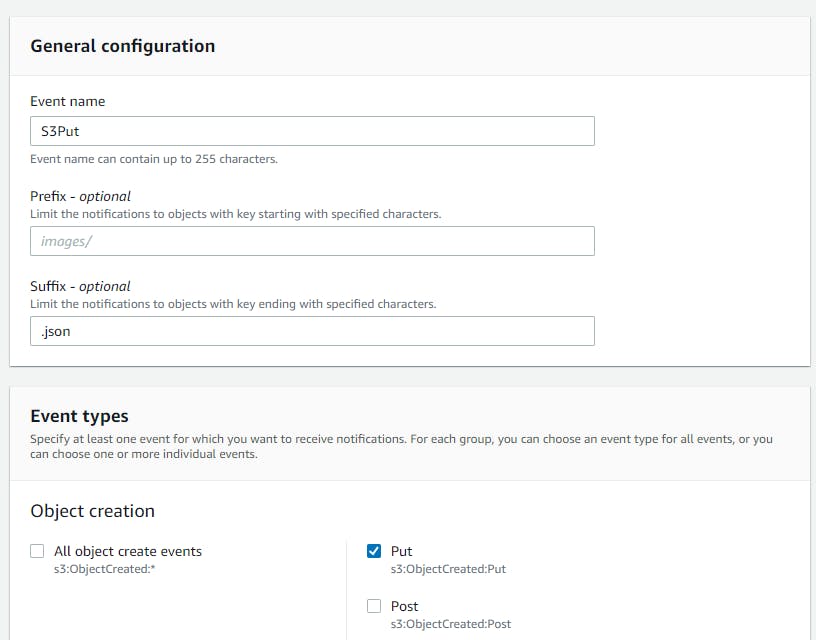
Create a new notification for a PUT event. You can also specify the file suffix and restrict them to JSON.
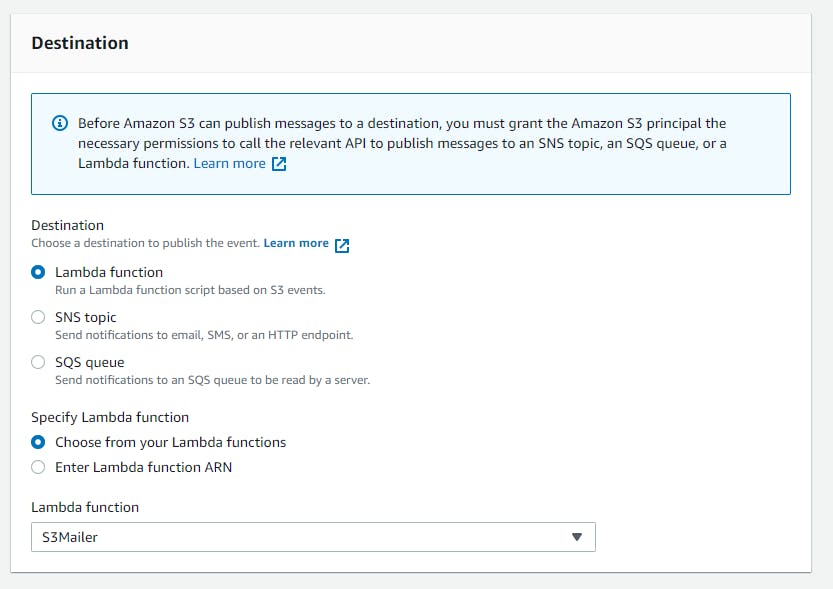
Click on Lambda Function as Destination and choose your function.
Creating an SES Identity
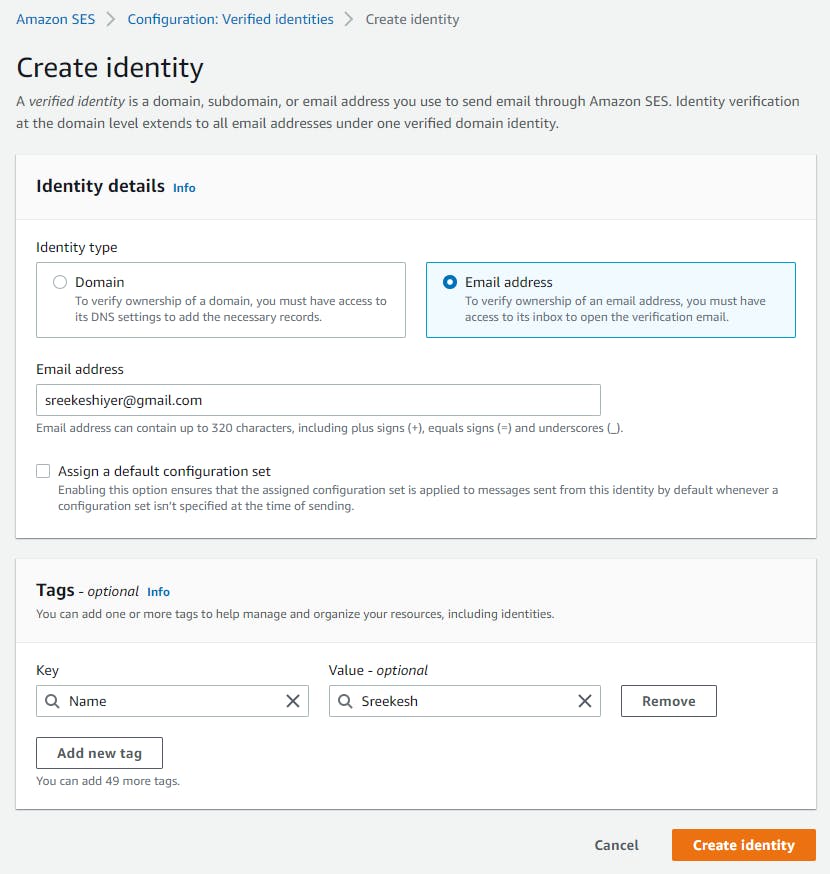
Create a New Identity in Amazon SES to verify your email.
The Sandbox Environment in Amazon SES
 Amazon SES, by default, is in a Sandbox Environment, where you're allowed to send mails from and to only verified email addresses.
To get out of the sandbox environment, you need to request production access from the SES Dashboard. It's a lengthy process where you have to justify reasons as to why you need this service.
For this demonstration, you can also verify the To-Addresses, so that you don't have to request production access.
We are finally done with the Cloud part. All we need to do now is create the API endpoint with an interface to upload PDF files, where the API extracts the text and uploads the JSON containing the name and email to the S3 Bucket.
This code is available on my GitHub Repository in case you don't want to code along.
Creating the Flask API
 Let's start with creating a new directory for our Flask project and launching it in VSCode.
Setting Up Initial files
 Create a file
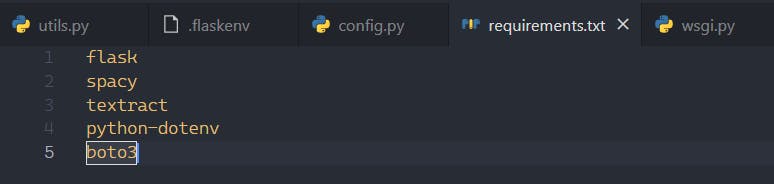
 wsgi.py to write the main server code, a utils.py file for utility functions, a config.py file for storing AWS Config Vars and a requirements.txt file for adding dependencies. We'll need flask, spacy, textract, python-dotenv and boto3 in our list of dependencies.
Creating a Virtual Environment
# Linux
sudo apt-get install python3-venv    # If needed
python3 -m venv .venv
source .venv/bin/activate

# macOS
python3 -m venv .venv
source .venv/bin/activate

# Windows
py -3 -m venv .venv
# Use forward slashes if you are using Git Bash
.venv\scripts\activate
You can run these commands depending on your OS to set up a virtual environment.
python -m pip install upgrade pip
pip install -r requirements.txt
Once that's done, we can upgrade pip and install our required dependencies.
Setting up the environment variables
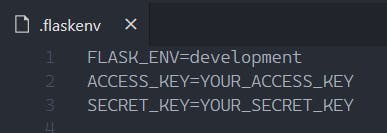
Create a .flaskenv file in the same directory and store the following environment variables. You'll get the ACCESS_KEY and SECRET_KEY from when you created the new IAM User.
Temporary Storage of PDF files
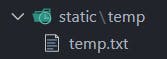
Create a folder static and a folder temp inside static to store PDF files temporarily. The files coming from a POST request in Flask are Werkzeug FileStorage Objects that seem to have some issues with textract.
Hence, we need to locally save them until we need them. We can store them in this temp folder. Once we have extracted the text, we'll delete the file from the system.
I've also created a temp.txt file so that git recognizes the folder, but that's not required here.
Boto Config
from botocore.config import Config

boto_config = Config(
        region_name = 'ap-south-1',
        retries = {
            'max_attempts': 10,
            'mode': 'standard'
        }
    )
Boto3 is the Python library that can be used to create AWS clients and resources. This however needs to be provided with some configurations, that are stored in the config.py file.
Writing all Utility Functions
import boto3
from textract import process
from os.path import join as ojoin
from os import remove as ormv
from os import getenv
from werkzeug.utils import secure_filename
from werkzeug.datastructures import FileStorage
from spacy import load as load_spacy_model
from spacy.cli import download as download_spacy_model
from spacy.matcher import Matcher
from re import findall
from config import boto_config
from json import dumps
from time import time

SAVE_DIR = "./static/temp/"
ALLOWED_EXTENSIONS = {"txt", "pdf", "doc", "docx"}

def allowed_file(filename: str) -> bool:
    """
    Utility function to check whether a file has a valid extension.
    """
    return "." in filename and filename.rsplit(".", 1)[1].lower() in ALLOWED_EXTENSIONS


def extract_text_from_file(file: FileStorage) -> dict[str, str]:
    """
    Extracts text from a file using the textract module.
    """
    if file and allowed_file(file.filename):

        # Create a secure version of the filename
        filename = secure_filename(file.filename)

        # Save the file locally
        file.save(ojoin(SAVE_DIR, filename))
        currFile = ojoin(SAVE_DIR) + filename

        # Extract text
        text = str(process(currFile).decode("utf-8"))

        # Remove the file from the file system
        ormv(ojoin(SAVE_DIR, filename))

        return {"text": text, "filename": filename}


def extract_name_and_email(text: str) -> dict[str, str]:
    """
        Extract name and email from Resume file. \n
        Returns a dictionary.
    """

    # Load pre-trained model
    try:
        nlp = load_spacy_model("en_core_web_sm")
    except:  # If not present, we download
        download_spacy_model("en_core_web_sm")
        nlp = load_spacy_model("en_core_web_sm")

    # Initialize Matcher with a Vocabulary

    matcher = Matcher(nlp.vocab)

    def extract_name(text: str) -> str:
        """
        Extract name from resume text using NLP
        """
        nlp_text = nlp(text)

        # First name and Last name are always Proper Nouns
        pattern = [{"POS": "PROPN"}, {"POS": "PROPN"}]
        matcher.add("NAME", [pattern])

        matches = matcher(nlp_text)

        for match_id, start, end in matches:
            span = nlp_text[start:end]
            return span.text

    def extract_email(text: str) -> str:
        """
        Extract email using Regular Expression
        """
        email = findall("([^@|\s]+@[^@]+\.[^@|\s]+)", text)
        if email:
            try:
                return email[0].split()[0].strip(";")
            except IndexError:
                return None

    return {
        "email": extract_email(text),
        "name": extract_name(text)
    }

def upload_file_to_bucket(obj: dict[str, str], filename: str) -> None:

    # Create an S3 Resource
    s3 = boto3.resource(
        's3',
        config=boto_config,
        aws_access_key_id=getenv('ACCESS_KEY'),
        aws_secret_access_key=getenv('SECRET_KEY'))
    new_file = filename.split('.')[0]

    # Put the JSON object to the bucket
    s3.Bucket('YOUR_BUCKET_NAME').put_object(
        Body=dumps(obj),
        Key=f'{new_file}_{int(time())}.json',
        ContentType='application/json'
    )
These are all the utility functions you'll need to upload the JSON file to the Amazon S3 Bucket.
Creating Templates
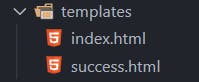 Create a folder called templates and create two files
 index.html and success.html for a simple user interface to upload files.
The markup for index.html
<!DOCTYPE html>
<html lang="en">
    <head>
        <meta charset="UTF-8" />
        <meta http-equiv="X-UA-Compatible" content="IE=edge" />
        <meta name="viewport" content="width=device-width, initial-scale=1.0" />
        <title>Resume Parser</title>
        <script src="https://cdn.tailwindcss.com"></script>
    </head>
    <body>
        <form
            class="flex flex-col w-full h-screen items-center justify-center bg-grey-lighter"
            method="POST"
            action="{{url_for('add_files_to_bucket')}}"
            enctype="multipart/form-data"
        >
            <label
                class="w-64 flex flex-col items-center px-4 py-6 bg-white text-blue rounded-lg shadow-lg tracking-wide uppercase border border-blue cursor-pointer hover:bg-blue hover:text-white"
            >
                <svg
                    class="w-8 h-8"
                    fill="currentColor"
                    xmlns="http://www.w3.org/2000/svg"
                    viewBox="0 0 20 20"
                >
                    <path
                        d="M16.88 9.1A4 4 0 0 1 16 17H5a5 5 0 0 1-1-9.9V7a3 3 0 0 1 4.52-2.59A4.98 4.98 0 0 1 17 8c0 .38-.04.74-.12 1.1zM11 11h3l-4-4-4 4h3v3h2v-3z"
                    />
                </svg>
                <span class="mt-2 text-base leading-normal">Select Files</span>
                <input
                    multiple
                    type="file"
                    class="hidden"
                    id="resume"
                    name="resume"
                />
            </label>
            <button type="submit" class="mt-5 py-2 px-3 rounded-md bg-blue-200">
                Submit
            </button>
        </form>
    </body>
</html>
The markup for success.html
<!DOCTYPE html>
<html lang="en">
<head>
<meta charset="UTF-8" />
<meta http-equiv="X-UA-Compatible" content="IE=edge" />
<meta name="viewport" content="width=device-width, initial-scale=1.0" />
<title>Mails Sent!</title>
<script src="https://cdn.tailwindcss.com"></script>
</head>
<body>
<div
class="flex w-full h-screen items-center justify-center bg-grey-lighter"
>
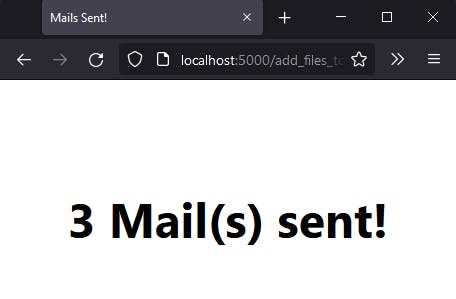
<h1 class="font-bold text-5xl">{{no_of_mails}} Mail(s) sent!</h1>
</div>
</body>
</html>
Writing the main Flask App code
from flask import Flask, render_template, request
from utils import extract_text_from_file, extract_name_and_email, upload_file_to_bucket

app = Flask(__name__)

@app.route('/')
def home():
    return render_template('index.html')

@app.route('/add_files_to_bucket', methods=["POST"])
def add_files_to_bucket():
    mail_count = 0
    for file in request.files.getlist("resume"):
        if file.filename != "":

            extracted_response = extract_text_from_file(file)

            filename = extracted_response['filename']
            text = extracted_response['text']

            obj = extract_name_and_email(text)
            upload_file_to_bucket(obj=obj, filename=filename)

            mail_count += 1

    return render_template('success.html', no_of_mails=mail_count)

if __name__ == '__main__':
    app.run(debug=True)
We can now make use of these utility functions in the main wsgi.py file to complete the application.
Running the Flask App
flask run
We can use the command flask run to start the Flask application and look it up in our browser at localhost:5000.
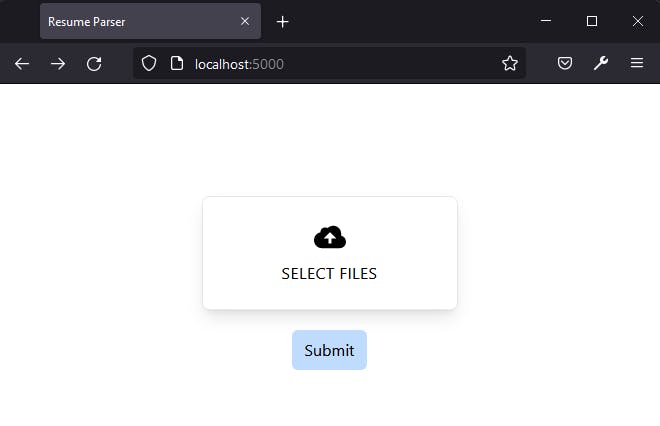
This is what the UI looks like, neat and simple, all we have to do now is upload a few Resumes!
Final Run
Right, can we have some 🥁🥁 please, it's time to run our application!
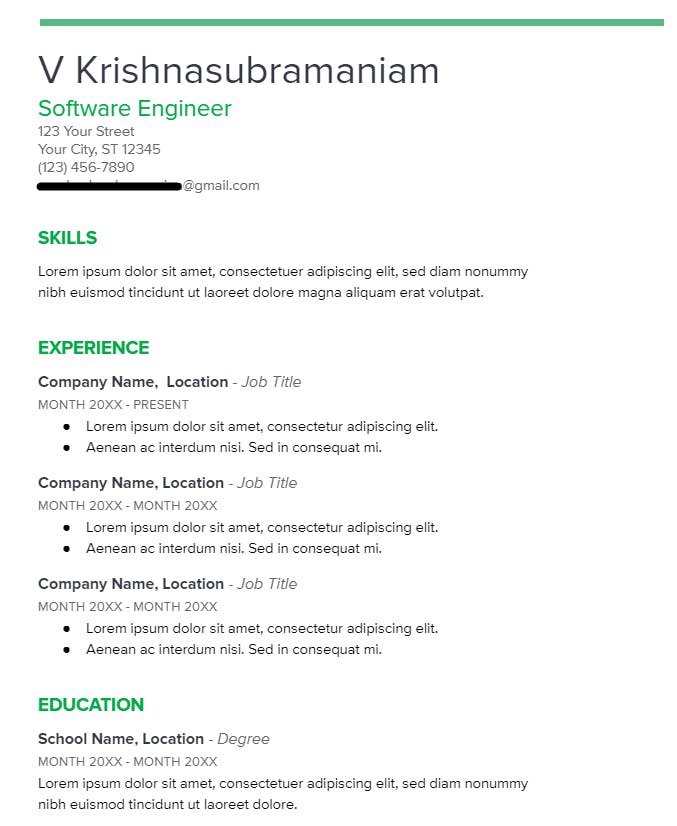
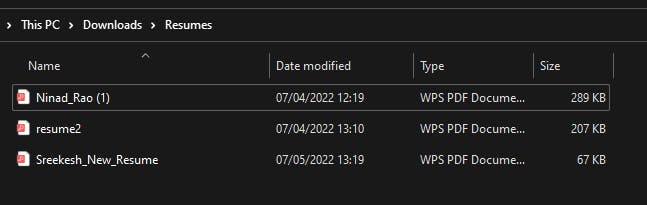 Here are a few Resumes I'm going to upload.
Results!
If you are wondering where that link in the email takes you
It's recommended that you clean up all the services you spun up for this demonstration once you're done experimenting to avoid surprise costs in your AWS Bill.
The Conclusions
The Cloud makes a lot of things simpler and much faster. In this little experiment, we understood the benefits of taking things serverless and with very little extra effort, we have an automated setup ready to be put into service. This wasn't the only way to solve this problem, there are many other ways possible that you can explore. We used a total of 4 cloud services (IAM, S3, Lambda and SES) along with a Flask API.
That's it for this thread, I hope you enjoyed working with these amazing cloud services.
Thank you for reading :)